Showing posts with label Gypsy. Show all posts

Sunday, January 16, 2011

Word/Shape Mini Scrapbooks

I am really having fun expanding my horizons. With my Gypsy I designed and completed 2 Word or Shape Mini Scrapbooks for gifts at Christmas. The first was a GARDEN Word Book for a wonderful young lady who is dating our best friends' son. The two of them spent a great deal of time last spring and summer helping our friend clean up and replant a beautiful garden, complete with flowers, paths, and veggies. So I thought a small album to collect a few of her memories would be an appropriate gift. Here are several pictures of the album as it was being made. This book is 5" x 11". I used Storybook for the letters.

Cardboard scraps cut out for the pages of the book.


Pages covered with thin, colored cardstock.


Finished product.


The second one I made for the same familys' youngest son, who ventured in to playing football this fall. So, he got a 11 x 11 Football shaped mini scrapbook. He was so tickled to get this. I am sure he will have fun reliving his memories for years to come.


I had a so much fun making these that I am working on a new one. I can not tell you about it yet since it is a surprise for someone, who might be reading this post...But I will share it soon.

Friday, August 13, 2010

Wi-Fi Blog update or Gypsy? Gypsy wins out!

Panera is one of those wonderful places that provide free Wi-Fi. I thought maybe I would make a post on my blog and figure out some of the other settings… Well, my Netbook acknowledged their connection but refused to stay connected long enough to do anything. I moved seats several times – this was the manager’s suggestion. Even sat right next to someone else who was not experiencing difficulties…Needless to say, I did not get online. So what is a girl to do? Pull out her Cricut Gypsy, of course. **you know, when I first bought it I thought maybe I would use it occasionally – but…**

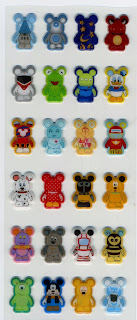
Now, what to create? In my bag was the package of stickers I had picked up the night before while visiting Downtown Disney with friends. Their daughters had been bitten by the Vinylmation collectables bug. As they wandered through several shops that carried these intriguing little guys, I thought **I might never buy one, but they would be fun to journal or scrap about**thus the stickers. Every good scrapbook page has to have a heading, title or element that draws you in. That being said, I decided to try to recreate the logo at the top of the packaging. Here is how I did it. I am pretty happy with my first attempt, but thinking it might need to be bigger.


In a new project, go to Lacy Labels and choose the #18 Label. I am using Tammy’s (from Creative Critter Cricut Club) numbering system. On the basic tab, unlock the aspect ratio (the infinity sign between width & height labels)


Then tap on width measurement. This should highlight the number. Using the large/small buttons, make your shape wider or narrower. I had to lengthen mine without making it any taller.


Copy the final shape, and manipulate the height and width separately to create a slightly larger layer that will be the white in our final project.


Copy this shape and manipulate one more time to make a slightly larger black outline for the whole shape.

Arrange each shape on to your cutting mat.

Choose Jasmine Font, typing the word “Vinylmation”.

Use the Kerning setting to remove space between letters allowing you to weld letters together

Move the word to center in the smallest of your label shapes

SAVE!!!

Cut!

After making this, I love it, but I will resize a bit bigger for the title of my page.

Thursday, July 29, 2010

How 'Bout Some Pie

First, an update on the Great Escape contest. The winners were announced, and I was not one of them. Congratulations to all of the talented Cricut Circle Guys and Gals that won or received an Honorable Mention.

PIE:
The Cricit Circle group started a daily challenge, to keep us on our toes. Here is my project for today's challenge: Use CIRCLES in a card, scrapbook layout or other item.


This is my basic recipe:
* 5" circle card from Wild Card - cut from tan (old Close to my heart cardstock)
* 5.5" circle red from Wild Card
* The circle was run through my CB with the Spots & Dots embossing folder, if you look closely you can see where I had to come back through a second time and overlapped just slightly trying to get the the 3/4" embossed that did not fit in the folder the first time.
* 5.8" scallop circle Mini Monogram welded with the argyle crosshatch from Wild Card to create the crust effect. I eliminated the outside frame and several of the setting triangles around the outside to create a more rounded shape, unlinked height/width and then made the H/W equal then welded with the scallop.
* Inked with Aged Linen and Aged photo inks, and used some stickles to add some fun. After I finished photographing


The inside was to say "You're such a Sweety Pie" but sweety pie got a bit messed up when Stitch, my furry helper, jumped up on the table... gotta love the furry friends.