Saturday, August 28, 2010

My first Blog Hop and a Treasure Box “found”

I am so excited to be a part of my first Blog Hop. For my friends that are not familiar with a Blog Hop, it is an organized series of Blogs. Participants "hop" or travel from one blog to the next, reading posts and commenting on the bloggers work or thoughts. Some will be offering "blog candy" or prizes to a lucky visitor.

All of the bloggers involved have decided to do a special project using our Cricut Circle member exclusive cartridge “French Manor.” I really like the objects on this cartridge. They have a fun, old timey, old world look to them. Even though I love the cartridge finding a way to put it to use in my 3rd grade classroom was a bit daunting. Why for my classroom? If you read my previous post you would know I have also decided to challenge myself to try using all of my Cricut cartridges in my classroom. I finally came up with an idea while setting up my classroom this week; redo my “Treasure Box.” It is just a small plastic storage box with the pencils, erasers; silly bands… my students get to choose from when they do something special.


I used my Gypsy to weld), the layer of willkommen (pg 75), and the layer of merci (pg 76) to create an outline for the treasure chest. Then I welded just the center of the screen shape (pg 54) to add some detail. Originally I planned to just cut this out in brown vinyl and adhere it to the box. The lid and box are clear so you could see the goodies through the paper trial I had cut. I did not like that, so I enlarged the outline shape to cut a gold solid shape go behind the chest. While I was at it I cut a keyhole (pg 63) for the chest and another for my box side. This is the first time I have worked with vinyl. I had some problems with bubbles. There was so much solid area on both layers. I figure, since pirate’s chest of gold are usually old and battered my blemishes just help give it a beat up look. I finished the chest off by adding “Treasure” cut at 3” in the Storybook thin Font.


I hope you enjoyed visiting my blog. It is new but growing. Please use the links below to keep hopping.

Jana http://imneverbored.blogspot.com/


Bobbi Jo http://sweetsassydiva-gspot.blogspot.com/


Beth http://seaswancreations.blogspot.com/

QuiltFrog’s Blog – YOU ARE HERE

Michele http://greengirlscraps.blogspot.com/


Kristen http://fantabulouslypink.blogspot.com/


Sherrie http://impressionableart.blogspot.com/


Lori http://scrappinmystressaway.blogspot.com/

Gaby http://scrapabookaholic.blogspot.com/

Friday, August 20, 2010

Cricut Cartridges and a Cricut Circle Blogger's Challenge

 I have joined several other new bloggers, and Cricut Circle Members, challenging ourselves to create something from each cartridge we own.

I think I am going to add to this a few extra challenges to myself.
1) Create something with each cartridge
2) Create something for use in my classroom with each cartridge
3) Create something with my Gypsy with each catridge

My challenge will be to create something fun with images from each cartridge. This will allow me to explore the images I have and try basic techniques of paper crafting along the way. Many of these projects might just be a scrapbook layout or a card. There are so many wonderful crafters out there showing the best, biggest new techniques. I hope to find a niche showing simple, quick, but still nice, something those with less tools, or new to the craft can try.

The second challenge will make me see if I can find ways to use images in my classroom. --some cartridges don't seem so "school" related (like French Manor), so this should be fun.

Lastly,  using the Gypsy will allow me to stretch my creativity a bit more.

I will be color coding each cartridge title indicating which challenge I have met, (see Cartridge Page for my list) Please keep an eye out for future posts and watch my list as I start checking off my progress. - I will be updating my "Cartidge Page" as I finish something.

Friday, August 13, 2010

Wi-Fi Blog update or Gypsy? Gypsy wins out!

Panera is one of those wonderful places that provide free Wi-Fi. I thought maybe I would make a post on my blog and figure out some of the other settings… Well, my Netbook acknowledged their connection but refused to stay connected long enough to do anything. I moved seats several times – this was the manager’s suggestion. Even sat right next to someone else who was not experiencing difficulties…Needless to say, I did not get online. So what is a girl to do? Pull out her Cricut Gypsy, of course. **you know, when I first bought it I thought maybe I would use it occasionally – but…**

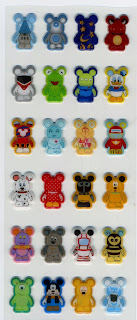
Now, what to create? In my bag was the package of stickers I had picked up the night before while visiting Downtown Disney with friends. Their daughters had been bitten by the Vinylmation collectables bug. As they wandered through several shops that carried these intriguing little guys, I thought **I might never buy one, but they would be fun to journal or scrap about**thus the stickers. Every good scrapbook page has to have a heading, title or element that draws you in. That being said, I decided to try to recreate the logo at the top of the packaging. Here is how I did it. I am pretty happy with my first attempt, but thinking it might need to be bigger.


In a new project, go to Lacy Labels and choose the #18 Label. I am using Tammy’s (from Creative Critter Cricut Club) numbering system. On the basic tab, unlock the aspect ratio (the infinity sign between width & height labels)


Then tap on width measurement. This should highlight the number. Using the large/small buttons, make your shape wider or narrower. I had to lengthen mine without making it any taller.


Copy the final shape, and manipulate the height and width separately to create a slightly larger layer that will be the white in our final project.


Copy this shape and manipulate one more time to make a slightly larger black outline for the whole shape.

Arrange each shape on to your cutting mat.

Choose Jasmine Font, typing the word “Vinylmation”.

Use the Kerning setting to remove space between letters allowing you to weld letters together

Move the word to center in the smallest of your label shapes

SAVE!!!

Cut!

After making this, I love it, but I will resize a bit bigger for the title of my page.

Monday, August 9, 2010

I Want to Introduce You...

I thought I would take some time to post a little introduction to another blog. Grace Pixs is a new blog/storefront by a friend of mine, Cheri. She takes the most amazing photos of gardens and classic cars (an unusual combo, I know). These photos are double matted and made into greeting cards, which are just as beautiful as the pictures. Each card is unique.

Please take a minute to view a few of the cards she has posted for sale on her site.

Thank you for visiting her site.---QuiltFrog

Friday, August 6, 2010

My Work is Featured on Kricut Krazy's Blog

Kricut Krazy - Tangee, asked her Cricut Circle friends to help her with a project for her blog. Tangee has been trying to create each of the projects featured at the begining of each Cricut Cartridge handbook. I volunteered to do the project from Potpourri Basket Cartridge. Here is the post on Kricut Krazy's blog:

Potpourri Project


Kind of appropriate for me don't you think?

Wednesday, August 4, 2010

A Clean Drawer = Infomercial Entry

This week’s contest for Cricut Circle Members is to “Show us (Provo Craft) your BEST Cricut project and you could win a coveted spot in an infomercial …” So I wandered around mulling over ideas in my mind… while working on other projects, birthday presents… Last night as I was falling asleep an idea came to me that would allow me to clean out some things I have collected and play with my Cricut.

As Disney Annual Pass Holders my dear hubby and I have spent a lot of time at “the Park,” and began collecting pins of our favorite characters, special events, or fond memories. We collected too many to keep on a lanyard or two or twelve… so most ended up in a drawer. This was the foundation for my project. Find a way to mount the pins in a shadow box in a cheerful and appealing way. The Shadow boxes I found at Michael’s are called “4-Way” Adjustable Depth Project Frame, 12“x 12”. They have 3 small spacer frames between the glass and the backing that can be added or removed as needed to allow for the thickness of your items. I also grabbed some 3/16” foam core board. I chose to focus on just one selection of our pin collection, Goofy. --- I had soooo many pins I ended up having to use 2 frames.


Here is the shadowbox I purchased and one of the 3 spacers that came in the frame.


The materials used:
Mickey & Friends Cartridge
1 – 12 inch square of 3/16 inch per frame
1 – 12 inch square 4-way Adjustable Depth Project Frame
Cardstock – black, white, peach/flesh, pink, blue, orange, brown, green (1-2), yellow (2-3)
Patterned paper (12x12)
Adhesive – glue pen, extra tacky strips, & glue dots
Steps to make your own pin collection board:
Mount patterned paper to foam core board using extra tacky tape.
Cut Goofy #3 at 7 inches.
Cut Grass (sun Layer 3 non shift) at 1 inch, you will need 8 – 9 of these.
Cut Sun, all layers, at 3 ½ inches.
Adhere all character pieces together and add to your 12 x 12 mounted foam core.
Set your collector pins on board (do NOT push into core board) to look at arrangement.
Add glue dots to bottom end of each pin. **Make sure you do the next step on top of a protected surface such as a cutting mat -quilting, CM shape maker...- otherwise you may put small holes in your table top. Pins will stick out ever so slightly*****Poke pin points through patterned paper and core board, making sure to push straight down, adhering glue dots to board.
I layered the frame contents as follows: Glass, spacer, foam core, spacer, backing...

I know there are many places we visit on vacations offer small pins for collecting, or trading. With all of the cartridges such as Destinations, etc. this project could be easily adapted to use with pins collected on a special road trip. - I think I will do one with our pins from Yosemite, along with a few Cricut cuts and a photo or two.... OOOOH new project.

Sunday, August 1, 2010

You are My Shining Star Quilt

Yesterday my hubby and I had dinner with our "daughter" and her hubby (newlyweds) to catch up on life as a wedded couple... But before I go into that, I should probably explain why there are quotations around the word Daughter. Ivette is one of my former students - 19 years ago, in 4th grade. Her mother and I became friends over the years that Ivette and her siblings were at the school. As Ivette grew up it became evident to her mother and I that Ivette's social style (personality) was much more like mine than her mother's. This lead to many phone calls in which mom would hand the phone to Ivette and say, "Talk to your other mom," or "What is Ivette thinking? I don't get it?" --to which I would explain why people like Ivette (and me) would react a certain way. Needless to say supporting Ivette and her mom has been a highlight of our life. We would not trade any of it. She has been such a special part of our lives. We have been there to support all of the wonderful things Ivette has done. We love her dearly and are so proud of the poised, intelligent, successful young woman she has become.

For her wedding I wanted to make a quilt. The only thing I asked of the happy couple, was what colors? Ivette and I narrowed it down to the colors of their wedding - Black, White, and Teal. The black and white fabric was easy. Finding the right teal was a bit trickier. Finally found a few in the new Hoffmann Challenge Fab. Line. that matched well.
  Then for pattern. Something striking I think. How about a Lone Star with a twist (Larger inset diamonds). I found the pattern in "Lone Star Quilts & Beyond" by Jan Krentz . Here is the base star block.

And here is the finished quilt. I love the gradation of color in the black and white dot fabric I found for the setting pieces, and the "glow" of the thin teal strip circling the star.

I had it quilted by LongArm Quilter, and friend, Livinia Rosas. Here are some shots of some of the quilting. I love how Livinia worked various designs into the different shapes of the quilt (diamonds, setting squares, boarders.... )

The center of the quilt.
Setting square.
Borders.

Shining Star Quilt (because she is our shining star) with the newlyweds!