Monday, December 27, 2010

Santa's Little Brown Elves - aka UPS Drivers

I really do not like fighting crowds at the malls, or stores this time of year. Truth be told, I really don't like shopping in stores all that much, no matter what time of year it is. I choose instead to start browsing catalogs about mid summer, making notes of possible gifts for those I want to buy for. Then in October I start ordering gifts online. So much nicer to shop in my PJs!

  • Sidenote: My husband has been a driver for UPS for more than 27 years. He has been on the same residential route for the past 25 years. Needless to say, though we LOVE Christmas in our household, it is a tough time of year for him. The same number of houses in his route year round can jump from an average of 170 deliveries a day during the rest of the year, to 400+ during December.

So, I have a special empathy for our UPS guy who has to deliver all of my Christmas Shopping this time of year. We always try to give him something for his efforts. Thanks to UPS Tracking, I knew I was expecting the last box early last week. I knew this would be my last chance to catch him with our thank you (a tip, and some homemade cookies). We refer to my husband Dennis, as "Santa's Little Brown Elf" and that gave me the inspiration for this card.


The Card is a 5.5" Kraft Paper Card
Santa and Sleigh are from Jolly Holidays cut at 4.5"
I used my Gypsy to weld UPS letters (Street Sign) 1" into the front of the sleigh
I used a small piece of dark yellow paper behind the letter cut outs and then gold glitter glue over the top.
Sleigh runners are enhanced with dark brown glitter glue.

I then made another Jolly Holidays card in the UPS brown theme for my hubby's PreLoader - the poor guy who comes in early to cram all the boxes into the trucks in an organized manner. Every year Dennis give his preloader a tip to say thank you for all the extra he does this time of year.


Wagon - Boys will be Boys 3"
Elf - Jolly Holidays at 4.7"
Packages - Jolly Holidays at 2.2, 2.7, 3.2, 3.7"
I used  Stickles and Glitter Glue to enhance buttons, eyes, wheels, packages...

Sunday, December 26, 2010

Christmas Brunch Invitation

Last weekend I had the pleasure of hosting the annual Christmas Brunch for my quilting friendship circle, aka Bits and Pieces Quilters. (You can see some of our work at Bits & Pieces Quilters) I created this card as the official invitation for the event.

Recipe:
Card - Kraft Paper - cut 11x5.5, folded to 5.5 x 5.5
Back ground paper - DCWV  Holiday Collection Card -I used the fronts cut to 4.5 x 4.5
Elf and Wagon - Jolly Holidays Cartridge  cut at 3.0"
     buttons and wheels were enhanced with Glitter Glue.
     Elf and Wagon - pop dots
     Packages - cut from 1.75" at
                    - double stacked pop dot

Friday, December 24, 2010

Wrapping Up the Holiday Cheer

The past few years I have really enjoyed a simpler wrapping style. I used to buy coordinated, printed papers, matching ribbons and bows to make each year's gifts "match." The problem with that is that every year there is a half roll of this and a partial roll of that...not ever enough to make it through a new year. Nor will the left overs go with anything I can find the next year. So, I have decided to go with the line from " A Few of My Favorite Things..." from The Sound of Music, "...Brown paper packages tied up with string..." I have purchased several rolls of brown kraft paper and twine. This year I found some green and red to go with the brown. I love the way the packages look under our tree. I can make the tags and embelishments any color and design I want and it always looks put together. There really is something to be said for simple pleasures.


Of course I use my Cricut to cut tags and various shapes for each package. 

Wednesday, December 22, 2010

A Few of My Favorite Things - Seasonal Treats


Elly's Candy, Snickerdoodles, and Tea Time Tidbits.

I love to bake! Christmas is a great excuse to dig out many of my grandmother's recipes and whip up several batches of our favorites. It has become a tradition to box up all of my brother's favorites and give them as part of his Christmas gift each year. So this past weekend had me cooking up several batches of Snickerdoodles, Tea Time Tidbits (aka Mexican Wedding Cakes, or Russian Tea Cakes), and something we call Elly's Candy, named after my great aunt Elly. I have included the recipes in my grandmother's handwriting.


In the picture above, I used sliced, toasted almonds for Elly's Candy. I also use chopped pecans for this recipe.

Our family also has a traditional drink mix to make this time of year, Moondust Tea, also known as Orange Spice Tea.

Moondust Tea Recipe:
2 c. Tang
1/2 c. Sugar
1/2 - 2/3 c. Country Time Lemonaid Mix
3/4 c. Instant Tea (no sweetner or lemon flavoring)
1 1/2 - 2 tsp. Cinnamon
1 tsp. Ground Cloves

Mix and store in sealed container. 1-2 tsp mix in 8 oz. hot water and ENJOY!

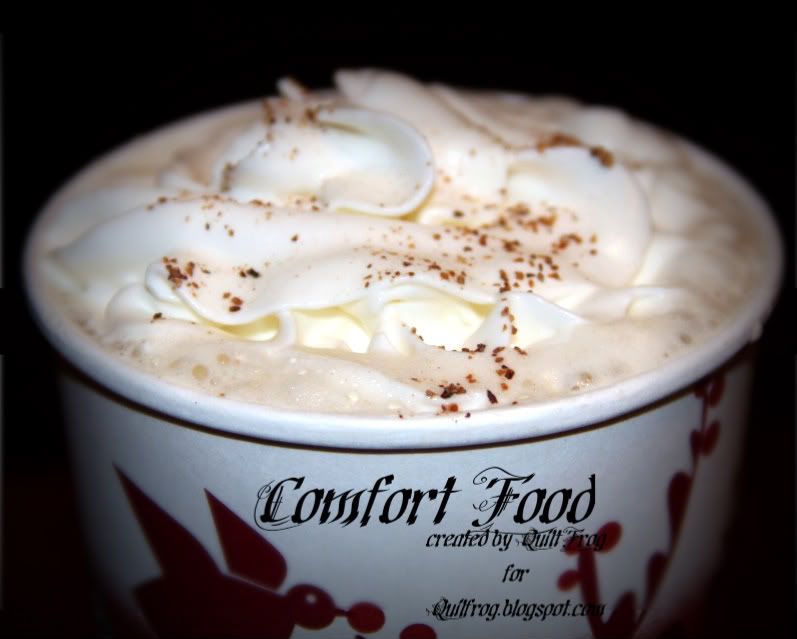
Finally, one of my favorite seasonal drinks is the Gingerbread Latte at Starbucks. I can usually keep my willpower intact most of the year when it comes to spending $4+ for Starbucks. But as soon as Gingerbread season hits, you will find me looking for any excuse to get to a Starbucks for a Gingerbread Latte. The Cricut Circle has started a photography challenge thread. The second challenge was focal point and favorite snack. I chose to photograph a Gingerbread Latte. Here is my entry.


Holiday Greetings

The days from the start of the school year each fall until Chirstmas seems to just fly by too fast. Between getting my classroom started for the year, settling into classroom routines, Halloween, report cards, Thanksgiving, and then Christmas...there really is not a much down time for an elementary school teacher. This year has been no exception. I cannot believe it is the first Monday of Christmas break already! I really am not sure where 3 1/2 months have gone.

Because of several nerve wracking events in my family's life this fall, our Christmas Card was turned into a Thanksgiving themed letter and card to family and friends. I used a variety of pictures of my husband, Dennis, and myself, a few boxes of DCWV Autumn Splendor Cards, and some coordinating papers to make the cards.


Recipe:
Wallet sized photos, some trimmed
Corner Rounder
George and Basic Shapes Cart - ovals at 3.3"
Celebrate with a Flourish Cart - Leaves at 1.75"
George Cart - Squares and Rectangles
Celebrate with a Flourish Cart - Words at 1.5"

I hope as you reflect on this year, you will find many things to be thankful for.

Tuesday, December 21, 2010

What a Day!!!

It has been raining nonstop since Thursday of last week here in So Cal. As of yesterday we have had more than 4 1/2 inches of rain in the past 5 days. For a "semi-aerid" region, we sure are wet right now. Most people would choose to stay home in a nice dry, warm house in this type of weather. But I chose instead to get up early and break in my new Disneyland Annual Pass. This is my present each year from my hubby, and my new card arrived just days ago. So, I had to make sure it works!

Actually, my real reason for heading to the Happiest Place was to try to get one of the illusive tickets for a handmade candy cane. You might be laughing at this thinking, "It is "just a candy cane." Yes this is true. But it is a HANDMADE Disney Tradition that very few people get to experience each year. The canes are the length of your hand and forearm; and They only make 3 batches a day, on 4 specific days during the holiday season. You have to get into line as soon as the park opens. For me this meant at the entrance at 7:30 am, in the rain. Into the park at 8 am straight up. The line for tickets was, by the time I walked through the entrance and headed down Main Street, in front of the Clock Shop and starting down the front of the Emporium. Unfortunately, this meant I did not get one of the tickets. Darn! One Cast Member was handing out a write up about the candy making process.

Here are some of the statistics they gave:
  • Takes 1/2 hour to cook a batch and about an hour to pull each batch
  • Each batch makes about 40 Candy Canes
  • Only 3 batches are made during the day
  • A team of three Candy Makers are needed to make a batch of Candy Canes (1 rolls the candy, 1 pulls the 15 pound block of candy, and 1 shapes the canes.
Here are few shots I took while watching the process this morning.


After watching them make the candy for a few minutes. I decided that I needed a blueberry muffin and a coffee to console myself. And SOME WARM CLOTHES! So, I headed to the Bakery on Main Street. I found my usual breakfast, and these cute treats too.


Since I have a pass and don't have to feel guilty for not staying ALL day (I can come back anytime I want.) I decided home was a better place to be.

Monday, December 20, 2010

Thanksgiving Cards for Friends

This year we spent Thanksgiving Day with friends. This group truly has become a second family to us over the years, and we appreciate the fact that they have included us in yet another famiy tradition. To say thank you, I made the following Thank You card to send to all the various households involved in the day's events. This design was originally created by Kristy at Craftin-on-My-Door and shared on the Cricut Circle Message Boards. Thank you, Kristy, for sharing with us.

Recipe:

Square Card - kraft paper cut 11 x 5.5, folded to 5.5 x 5.5
Background element - DCWV Amber Autumn Paper Pack,
                                - Lacy Labels Cart, cut Flower2 at 5"x 5"
Turkey - Cardstock scraps
            - DoodleCharms Cart, Turkey cut @ 2 1/2 "
Inked edges - Creative Memories, Brown Chalk Ink
Pop dots under Turkey shadow and the "paper" cap on the turkey legs

At our Thanksgiving festivities I also gave everyone a jar of Moondust Tea Mix (Orange Spice Tea), a holiday favorite in my family. I used 1/2 pint jars (cheaper by the dozen at the grocery store), and cut a circle and a ring out of coordinating papers to attach to the lid. These were cut at 2 1/2" from George and Basic Shapes Cart.)


I added leaves cut at 1.7" from the Thanksgiving cartridge, and a 4" tag, Rolly Poly font, Plantain Schoolbook cart.


Thursday, November 25, 2010

Seasonal Treats

Today I would like to share a few simple seasonal treats I have made in the past month or so. You don't have to have any fancy equipment (i.e. cricut) or tools. They can be made with printed papers, precut shapes and stickers that you might have laying around in your scrapbook stuff. I will be adding picture of new versions I make using left over stickers and die cuts next week.

Halloween Treat Bags


For these I cut square of patterned card stock for the base. The paper in the picture came from the DCWV Amber Autumn Fall Stacks. The Creatures are from Mini Monsters and the Jack o Lantern (far left) is from the seasonal cart Pumpkin Carving. I welded one of the faces to one of the pumpkin shapes. Then cut out the welded shape in orange, the basic shape no face in yellow and then a shadow in black (just a slightly larger cut). I stuck mismatched "googly eyes" on all of the critters using small glue dots.I thought he looked sad after I took this picture so I added some eyes to him. The bags are 9 x 4 inch bags from Michael's in the treat/candy making section. Lastly, I stuffed the bags with treats for my students, taped the bag closed and then stapled the base of the bag topper to the bag for stability.

"Recipe"
6 x 6 inch patterned card stock for base
3.5 to 3.75 inch Shapes of your choosing
4 x 9 inch treat bags

Thanksgiving Treat Box


Here is a close up of the box front I made using instructions a friend shared with me. You can see the tutorial she shared with me on Pink Buckaroo's blog, at Pink Buckaroo's Soap Holder. For my holders I used Bazzil Basics and Amber Autumn papers, CM Chalk inks, and 1" square punch. I put fall scent and cupcake scented Bath and Body Works hand sanitizer inside.


I had to make a few changes to be able to use the tools I had around my workroom. Instead of the oval punch Pink Buckaroo used (she is a CTMH rep) I used the 1" square punch from CM (I am a CM rep). I cut one square centered between the 1/4" scorings, and then shifted my punch to cut about 1/3 of the square again on each end of the initial square. That gave me a big enough hole to put my little bottles in. The acorn is cream card stock cut from Give a Hoot cut at 3 inches. I inked the edges of my acorn and then ran the base of it through my Cuttlebug with a sizzix folder called Diamonds. The cap cut in dark brown, inked and run through the Cuttlebug with CB Swiss Dots folder. The leaf was inked in green and stem drawn on with a pen. I ran out of scraps of one off white paper so you can see my leaves especially came out different colors. The acorn was attached with pop dots. I added some repositionable tape to the back of the flap to keep it closed.

Well, I will post more later, but for now I hope everyone is finding a great way to celebrate all you have to be thankful for. Enjoy the holidays, be safe if you are out to do the Black Friday shopping tomorrow, and come visit again soon.

Me? Today we are going to enjoy the company of good friends, and tomorrow I am going to an all day crop, more good friends.


Thursday, November 4, 2010

Contest ---ProMarker Alcohol Markers

A great artist and blogger, Enfys is giving away a full set of ProMarker Alcohol pens. Please see her blog, video tutorials and if you are interested, enter her contest for the pens.

http://going-buggy.blogspot.com/

Sunday, October 17, 2010

Classroom PaperDolls

This is one of the first bulletin boards we did in as a class. It involved our names and images of ourselves.


First - using sentence strips folded in 1/2 3 times to create 8 equal squares. Each strip I wrote one students name horizontally on one side, vertically on the other. I trimmed the excess squares or glued a few to accomodate long or short names. Then we worked as a class to create the crosword puzzle that shows us all connected.


Next - the students created images of themselves. I cut 7" paperdolls out in various skin tones. Then using PeachyKeen stamps gave them all faces. I cut tag board into large pieces to use on my 12 x 24 mats. In these I cut out a variet of hair, shoes and clothing for my students to trace. Originally I was going to give them the cuts to trace and then decided to use the sheets as templates too. My kids traced their choice of clothing, hair and shoes onto a plain piece of paper, colored and cut out to mount to their paperdoll.

Wednesday, October 13, 2010

My Hubby --My Hero

This blog entry is long overdue. I have been sidetracked the past month and a half by health challenges my husband has been going through. He is generally the healthiest person most of us know. He is a UPS driver, who runs daily for a living. Love that StairMaster - the steps in and out of his truck and up and down the apartment buildings. The first week of September saw him develop we thought was an allergic reaction to some unknown substance or a bite. Then other symptoms started to show up. This prompted a doctors visit. That visit turned into a multitude of visits to specialists and a myriad of tests. Yesterday was the last piece of the puzzle - a biopsy. A long and stressful day for both of us. Now to wait for the final answers.

He has been a bit overwhelmed with all the information, and activity surrounding him. I am glad I have been able to use some of my accumulated sick days to be with him every step of the way. But he has been the HERO through all this. He has kept his own outlook positive and given me strength when I was overwhelmed and worried. He is my hero today, and always. So I made this card for him to go with the silly games... that I put together as a recovery basket.


The Superman emblem is cut at 4". I inked the edges of the yellow and red with brown chalk ink from CM. The background mat was from a stack I bought but I don't have name. I embossed this with the clockworks folder for Cuttlebug, and inked the raised images. Sentiment printed on paper and mounted with foam squares.


For the inside I cut several tools from Handy Man (lite) at 2.5" to add to my sentiment. This is a reference to his trip to the Emergency room a few years ago while working on a home improvement project. He was hit in the head with a board that came loose as he was getting ready to nail it in place. Split open his scalp. The person who attended to him used staples to close the wound. A STAPLE GUN!!! Poor hubby still has a hard time with this idea.

My papers are all from various CM paper packs, with the exception of the mat on the front of the card.

Saturday, September 25, 2010

I Have to Get More Crafting Time in My Life

The beginning of the school year is pretty crazy. So I should know that my plans to play at night when I get home are all but lost. But every year it is the same story...I don't get as much done at work as I would like so I drag it home. I am exhausted, so I don't actually do much of the needed work...take it back to school. Never ending cycle. (If you are a teacher you are probably nodding in agreement to this)

Back to School Night is done; classroom routines are in place; and I don't feel quite as behind. SO as the title says, " I have to find more crafting time in my life." I have decided that I am going to make myself work on paper projects on Tuesday and Thursday evenings, whether cards, scrapbooks, etc. That will leave me a few days I can drag stuff home and a goal!

On to crafting...
Earlier this summer our friend lost his father to cancer. He was a wonderful man. You can see that fact reflected in his son's life. It seemed that there were many of my friends going through similar losses or anniversaries of a loss about the same time. One of them had posted a wonderful little poem on Facebook.

A Daughter’s Prayer

If sunflowers grow in Heaven Lord,
pick a bunch for me,
place them in my Father’s arms
and tell him they're from me.
Tell him I love and miss him
and when he turns to smile,
place a kiss upon his cheek
and hold him for awhile.
Remembering him is easy,
I do it every day, but there's an ache within my heart
that will never go away...I love and miss you Dad.

(I wish I knew who actually wrote this to give credit.)

I scraplifted, or perhaps craftlifted, this poem along with a design for an easel card with sunflowers to make a series of sympathy cards, for each of the family members, changing the Daughter/Father reference to fit the grandchild, wife, son...Here is one of the finished cards.


I made this card pre-blog, so I did not keep track of paper used or which cricut cartridge made the cuts. Sorry. I will dig around in my cards and see if I can identify the parts. I am pretty sure all of the paper are from Michaels or Joann's standard wracks of loose paper.

Tuesday, September 14, 2010

Wish I was my cat...

I am extremely tired this evening. I had a blast last night with a great group of ladies, running around Disneyland after hours. We were participating in the annual Minnie's Midnight Madness Castmember fundraising activity. Basically MMM consists of a 4 member team tethered together, walking briskly from one end of the park to the other, multiple times, searching out clues, solving puzzles, acting out Bohemian poetry, or other silly stunts. After each task we had to walk (running is not allowed) to the central hub in front of the castle to return our answer and get a new task. Have to say it is a great night, even if I did crawl into bed about 1:15 am only to be nudged awake by my alarm at 5:30 am. UGH! (that is the drawback, but I will pay the price)

This evening as I have been sitting in my comfy chair vegging, I can not help but think I would love to be my cat, Stitch,. right now. He can always find a comfy spot to sleep, will sleep anytime and in just about any position. Yep, to be a cat! What a great life! Here are a few of my current favorite photos of Stitch doing what he does best.
Stitch helping my friend Kim quilt.

Any place will work for a cat nap...even a paper cutter if it is a sunny window.

This is his favorite sleeping position...REALLY! We call it kitty yoga.
Don't you wish you could bend like that?

Well, I think I am about ready to call it a night. Hopefully tomorrow will find me refreshed and ready to create a few new things for my classroom. Until then, good night.

Sunday, September 5, 2010

Stationary Sets

This past month has been all about girly-girl birthdays. I had two nieces to make birthday gifts for. I don't know about you, but I always loved getting mail, and collecting stationary. I saw this great box idea shared on the Cricut Circle. The original directions are found at SplitcoastStampers: http://www.splitcoaststampers.com/resources/tutorials/stationerybox/

For my boxes I used BoBunny, Bazill and some older cardstock, whose maker I can not remember. I also included A2 sized cards made with some of the same cardstock. Use the STRONGEST adhesive you have for this as it is hard to get some of the small box parts to stay put. Especially if you use a gllittered or embossed paper as I did on the blue one.


I used a "One Sheet Wonder" pattern for this. What is a One Sheet Wonder? you ask. These are patterns for cutting one sheet of cardstock into many specific sizes rectangles and squares that are used to make 10-20 cards quickly. By cutting two or three coordinating papers in similar shapes and sizes you can mix and match to make a fun set of cards. Just finish off with some embelishments, such as stickers, a stamped phrase, or a flower or two. These sets go together quite quickly and make for a fun gift. I am sorry I don't have a link to the OSW I used. I couldn't find this as a was getting to post. I will find it and post at a later time.

Saturday, August 28, 2010

My first Blog Hop and a Treasure Box “found”

I am so excited to be a part of my first Blog Hop. For my friends that are not familiar with a Blog Hop, it is an organized series of Blogs. Participants "hop" or travel from one blog to the next, reading posts and commenting on the bloggers work or thoughts. Some will be offering "blog candy" or prizes to a lucky visitor.

All of the bloggers involved have decided to do a special project using our Cricut Circle member exclusive cartridge “French Manor.” I really like the objects on this cartridge. They have a fun, old timey, old world look to them. Even though I love the cartridge finding a way to put it to use in my 3rd grade classroom was a bit daunting. Why for my classroom? If you read my previous post you would know I have also decided to challenge myself to try using all of my Cricut cartridges in my classroom. I finally came up with an idea while setting up my classroom this week; redo my “Treasure Box.” It is just a small plastic storage box with the pencils, erasers; silly bands… my students get to choose from when they do something special.


I used my Gypsy to weld), the layer of willkommen (pg 75), and the layer of merci (pg 76) to create an outline for the treasure chest. Then I welded just the center of the screen shape (pg 54) to add some detail. Originally I planned to just cut this out in brown vinyl and adhere it to the box. The lid and box are clear so you could see the goodies through the paper trial I had cut. I did not like that, so I enlarged the outline shape to cut a gold solid shape go behind the chest. While I was at it I cut a keyhole (pg 63) for the chest and another for my box side. This is the first time I have worked with vinyl. I had some problems with bubbles. There was so much solid area on both layers. I figure, since pirate’s chest of gold are usually old and battered my blemishes just help give it a beat up look. I finished the chest off by adding “Treasure” cut at 3” in the Storybook thin Font.


I hope you enjoyed visiting my blog. It is new but growing. Please use the links below to keep hopping.

Jana http://imneverbored.blogspot.com/


Bobbi Jo http://sweetsassydiva-gspot.blogspot.com/


Beth http://seaswancreations.blogspot.com/

QuiltFrog’s Blog – YOU ARE HERE

Michele http://greengirlscraps.blogspot.com/


Kristen http://fantabulouslypink.blogspot.com/


Sherrie http://impressionableart.blogspot.com/


Lori http://scrappinmystressaway.blogspot.com/

Gaby http://scrapabookaholic.blogspot.com/

Friday, August 20, 2010

Cricut Cartridges and a Cricut Circle Blogger's Challenge

 I have joined several other new bloggers, and Cricut Circle Members, challenging ourselves to create something from each cartridge we own.

I think I am going to add to this a few extra challenges to myself.
1) Create something with each cartridge
2) Create something for use in my classroom with each cartridge
3) Create something with my Gypsy with each catridge

My challenge will be to create something fun with images from each cartridge. This will allow me to explore the images I have and try basic techniques of paper crafting along the way. Many of these projects might just be a scrapbook layout or a card. There are so many wonderful crafters out there showing the best, biggest new techniques. I hope to find a niche showing simple, quick, but still nice, something those with less tools, or new to the craft can try.

The second challenge will make me see if I can find ways to use images in my classroom. --some cartridges don't seem so "school" related (like French Manor), so this should be fun.

Lastly,  using the Gypsy will allow me to stretch my creativity a bit more.

I will be color coding each cartridge title indicating which challenge I have met, (see Cartridge Page for my list) Please keep an eye out for future posts and watch my list as I start checking off my progress. - I will be updating my "Cartidge Page" as I finish something.

Friday, August 13, 2010

Wi-Fi Blog update or Gypsy? Gypsy wins out!

Panera is one of those wonderful places that provide free Wi-Fi. I thought maybe I would make a post on my blog and figure out some of the other settings… Well, my Netbook acknowledged their connection but refused to stay connected long enough to do anything. I moved seats several times – this was the manager’s suggestion. Even sat right next to someone else who was not experiencing difficulties…Needless to say, I did not get online. So what is a girl to do? Pull out her Cricut Gypsy, of course. **you know, when I first bought it I thought maybe I would use it occasionally – but…**

Now, what to create? In my bag was the package of stickers I had picked up the night before while visiting Downtown Disney with friends. Their daughters had been bitten by the Vinylmation collectables bug. As they wandered through several shops that carried these intriguing little guys, I thought **I might never buy one, but they would be fun to journal or scrap about**thus the stickers. Every good scrapbook page has to have a heading, title or element that draws you in. That being said, I decided to try to recreate the logo at the top of the packaging. Here is how I did it. I am pretty happy with my first attempt, but thinking it might need to be bigger.


In a new project, go to Lacy Labels and choose the #18 Label. I am using Tammy’s (from Creative Critter Cricut Club) numbering system. On the basic tab, unlock the aspect ratio (the infinity sign between width & height labels)


Then tap on width measurement. This should highlight the number. Using the large/small buttons, make your shape wider or narrower. I had to lengthen mine without making it any taller.


Copy the final shape, and manipulate the height and width separately to create a slightly larger layer that will be the white in our final project.


Copy this shape and manipulate one more time to make a slightly larger black outline for the whole shape.

Arrange each shape on to your cutting mat.

Choose Jasmine Font, typing the word “Vinylmation”.

Use the Kerning setting to remove space between letters allowing you to weld letters together

Move the word to center in the smallest of your label shapes

SAVE!!!

Cut!

After making this, I love it, but I will resize a bit bigger for the title of my page.

Monday, August 9, 2010

I Want to Introduce You...

I thought I would take some time to post a little introduction to another blog. Grace Pixs is a new blog/storefront by a friend of mine, Cheri. She takes the most amazing photos of gardens and classic cars (an unusual combo, I know). These photos are double matted and made into greeting cards, which are just as beautiful as the pictures. Each card is unique.

Please take a minute to view a few of the cards she has posted for sale on her site.

Thank you for visiting her site.---QuiltFrog

Friday, August 6, 2010

My Work is Featured on Kricut Krazy's Blog

Kricut Krazy - Tangee, asked her Cricut Circle friends to help her with a project for her blog. Tangee has been trying to create each of the projects featured at the begining of each Cricut Cartridge handbook. I volunteered to do the project from Potpourri Basket Cartridge. Here is the post on Kricut Krazy's blog:

Potpourri Project


Kind of appropriate for me don't you think?

Wednesday, August 4, 2010

A Clean Drawer = Infomercial Entry

This week’s contest for Cricut Circle Members is to “Show us (Provo Craft) your BEST Cricut project and you could win a coveted spot in an infomercial …” So I wandered around mulling over ideas in my mind… while working on other projects, birthday presents… Last night as I was falling asleep an idea came to me that would allow me to clean out some things I have collected and play with my Cricut.

As Disney Annual Pass Holders my dear hubby and I have spent a lot of time at “the Park,” and began collecting pins of our favorite characters, special events, or fond memories. We collected too many to keep on a lanyard or two or twelve… so most ended up in a drawer. This was the foundation for my project. Find a way to mount the pins in a shadow box in a cheerful and appealing way. The Shadow boxes I found at Michael’s are called “4-Way” Adjustable Depth Project Frame, 12“x 12”. They have 3 small spacer frames between the glass and the backing that can be added or removed as needed to allow for the thickness of your items. I also grabbed some 3/16” foam core board. I chose to focus on just one selection of our pin collection, Goofy. --- I had soooo many pins I ended up having to use 2 frames.


Here is the shadowbox I purchased and one of the 3 spacers that came in the frame.


The materials used:
Mickey & Friends Cartridge
1 – 12 inch square of 3/16 inch per frame
1 – 12 inch square 4-way Adjustable Depth Project Frame
Cardstock – black, white, peach/flesh, pink, blue, orange, brown, green (1-2), yellow (2-3)
Patterned paper (12x12)
Adhesive – glue pen, extra tacky strips, & glue dots
Steps to make your own pin collection board:
Mount patterned paper to foam core board using extra tacky tape.
Cut Goofy #3 at 7 inches.
Cut Grass (sun Layer 3 non shift) at 1 inch, you will need 8 – 9 of these.
Cut Sun, all layers, at 3 ½ inches.
Adhere all character pieces together and add to your 12 x 12 mounted foam core.
Set your collector pins on board (do NOT push into core board) to look at arrangement.
Add glue dots to bottom end of each pin. **Make sure you do the next step on top of a protected surface such as a cutting mat -quilting, CM shape maker...- otherwise you may put small holes in your table top. Pins will stick out ever so slightly*****Poke pin points through patterned paper and core board, making sure to push straight down, adhering glue dots to board.
I layered the frame contents as follows: Glass, spacer, foam core, spacer, backing...

I know there are many places we visit on vacations offer small pins for collecting, or trading. With all of the cartridges such as Destinations, etc. this project could be easily adapted to use with pins collected on a special road trip. - I think I will do one with our pins from Yosemite, along with a few Cricut cuts and a photo or two.... OOOOH new project.

Sunday, August 1, 2010

You are My Shining Star Quilt

Yesterday my hubby and I had dinner with our "daughter" and her hubby (newlyweds) to catch up on life as a wedded couple... But before I go into that, I should probably explain why there are quotations around the word Daughter. Ivette is one of my former students - 19 years ago, in 4th grade. Her mother and I became friends over the years that Ivette and her siblings were at the school. As Ivette grew up it became evident to her mother and I that Ivette's social style (personality) was much more like mine than her mother's. This lead to many phone calls in which mom would hand the phone to Ivette and say, "Talk to your other mom," or "What is Ivette thinking? I don't get it?" --to which I would explain why people like Ivette (and me) would react a certain way. Needless to say supporting Ivette and her mom has been a highlight of our life. We would not trade any of it. She has been such a special part of our lives. We have been there to support all of the wonderful things Ivette has done. We love her dearly and are so proud of the poised, intelligent, successful young woman she has become.

For her wedding I wanted to make a quilt. The only thing I asked of the happy couple, was what colors? Ivette and I narrowed it down to the colors of their wedding - Black, White, and Teal. The black and white fabric was easy. Finding the right teal was a bit trickier. Finally found a few in the new Hoffmann Challenge Fab. Line. that matched well.
  Then for pattern. Something striking I think. How about a Lone Star with a twist (Larger inset diamonds). I found the pattern in "Lone Star Quilts & Beyond" by Jan Krentz . Here is the base star block.

And here is the finished quilt. I love the gradation of color in the black and white dot fabric I found for the setting pieces, and the "glow" of the thin teal strip circling the star.

I had it quilted by LongArm Quilter, and friend, Livinia Rosas. Here are some shots of some of the quilting. I love how Livinia worked various designs into the different shapes of the quilt (diamonds, setting squares, boarders.... )

The center of the quilt.
Setting square.
Borders.

Shining Star Quilt (because she is our shining star) with the newlyweds!