Thursday, July 29, 2010

How 'Bout Some Pie

First, an update on the Great Escape contest. The winners were announced, and I was not one of them. Congratulations to all of the talented Cricut Circle Guys and Gals that won or received an Honorable Mention.

PIE:
The Cricit Circle group started a daily challenge, to keep us on our toes. Here is my project for today's challenge: Use CIRCLES in a card, scrapbook layout or other item.


This is my basic recipe:
* 5" circle card from Wild Card - cut from tan (old Close to my heart cardstock)
* 5.5" circle red from Wild Card
* The circle was run through my CB with the Spots & Dots embossing folder, if you look closely you can see where I had to come back through a second time and overlapped just slightly trying to get the the 3/4" embossed that did not fit in the folder the first time.
* 5.8" scallop circle Mini Monogram welded with the argyle crosshatch from Wild Card to create the crust effect. I eliminated the outside frame and several of the setting triangles around the outside to create a more rounded shape, unlinked height/width and then made the H/W equal then welded with the scallop.
* Inked with Aged Linen and Aged photo inks, and used some stickles to add some fun. After I finished photographing


The inside was to say "You're such a Sweety Pie" but sweety pie got a bit messed up when Stitch, my furry helper, jumped up on the table... gotta love the furry friends.

Monday, July 26, 2010

Waiting to hear...

I have been working at the District Office all day on a curriculum committee. Though I promise I was focused on the task at hand, part of me kept thinking…”Will I get a call? Or an email? Or will I learn the winner when I log on to the Cricut Circle Message Boards?” What am I so anxious about? I entered a contest about a week and a half ago using my Cricut and Bazzil Papers. All of our cards (entries) were for the Leukemia Foundation. The card maker who wins the contest (use ProvoCraft tools, and Bazzil Papers in a creative way) will get a trip to “Creative Escapes” scrapbook/paper craft retreat. See link for more info.

I sent in the following card as my entry.
I used the Cricut Gypsy to play with several different designs and cuts – a sea horse + coral + sea weed = Leafy Sea Dragon, my favorite animal. I love how he came out, but now I have to make one for myself!

It is now 4:36 pm Pacific Time…I still have not heard… I sure hope someone wins soon.

Sunday, July 25, 2010

Leftovers – Solution #2


In my first post about finding uses for extra stickers, I shared ideas grouping similar stickers on card stock to make simple but nice cards for any occasion. All of my examples were flat, simple cards. Today's examples are a bit more dimensional, using foam "pop dots" or foam tape. Still simple but bump it up a bit.
Here are a few of the things I pulled out in anticipation of this project: Cardstock, foam dots, adhesive, leftover stickers and shape punches.


Card 1:
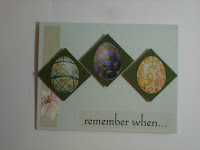
First, place a piece of a border sticker on one edge of card (or substitute half inch wide strip of patterned paper). Then score a line horizontally along the front of the card, VERY lightly.


This will be used to line up the elements. Cut 3 squares at 1.5" and add stickers from one of your leftover sets, to the squares set on point. Add a foam dot under each one. Starting at one side of the card, line up the corners along the score line. Next, do the opposite side, leaving the center square for last. Add a saying of your own choosing (sticker, or written).


Card 2:
Cut a piece of patterned paper 4" x 5.25" and adhere on card. Score a horizontal line for this card. Punch 3 -1.25" squares. Add stickers to squares and adhere to score line with foam dots. Choose a second sticker or a saying to add to front. –This card was made with stickers from an Easter sheet but I think it would be a great baby card, so I found a sentiment that fit, "Precious".

Card 3:
For larger stickers consider mounting to cardstock. Then cut out and adhere with foam dots. Add paper strips or sticker strips for added dimension and interest.

Card 4:
Another large sticker – (This is in the shape of a tag.) Mount on coordinating cardstock and cut out. Add ribbon pieces, and a torn strip of cardstock under to add interest.

Card 5:
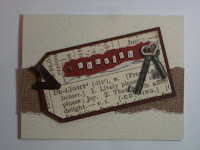
For this one cut cardstock into an interesting shape, in this case I used the CM Tag punch. Add borderline stickers or patterned paper to enhance the effect.


In several of these I added one or two small sticker to an inside corner to tie the card together. I realize not everyone makes cards and scrapbooks, but wouldn't it be fun to surprise someone special with a handmade note. The second card could also be used as an embelishment on a scrapbook page about a new baby. Think about how the stickers you have can be used for another event. The scrapbook supplies you probably already have on hand are all you need to make the items I have shared.

Saturday, July 24, 2010

Leftovers - Solution #1

I love to by packages of embellishments and stickers that go with a scrapbook layout I am planning. There are usually a few stickers on the sheet that I just have to have. I am sure you are the same way. I think most of us that scrapbook, stamp, or do other paper crafting do the same thing. But after organizing my materials a bit better, I have been struck with the question –“What do I do with leftovers I found in my stash?” My goal this week is to try some of the ideas floating around in my head, or in the blogosphere… in hopes of answering this question, AND use some of my own left overs.

Solution #1: Make some simple but beautiful cards:


To try this for yourself you will need the following materials:
I used stickers from the same strip or set to ensure that the color and design go well with each other. For these particular cards I just set the stickers flat on the smaller mat piece and then adhere this mat on to the card. Since the style of the card depends on what stickers you have, I will let the design be your choice. Remember in design odd numbers of objects give a better balance.

Card base: 1 piece cardstock (5.5” x 8.5”) – this is half a letter sized piece, or an A2 sized card
Mat #1: 1 piece cardstock (5.25” x 4”)
Mat #2: 1 piece cardstock (5” x 3.75”) – optional
Adhesive
Left over stickers
If you have left over printed paper or cardstock you purchased to go with a specific sticker set, try using them as your card and mat.

Solution #2 - Adding dimension to leftovers.

Thursday, July 22, 2010

The Phone Call!

Since April of 2009 I have been a happy owner of a Cricut Expression, the large paper cutting system created by Provo Craft. It is a fun machine and came with some fun perks, the best of which is a world of Cricut users who love to share what they have learned or created. We have communicated via personal Blogs and Message Boards, encouraging and challenging each other.

Last month Provo Craft announced an exclusive Cricut users club, the Cricut Circle, so naturally I had to join. In the week and a half the Cricut Circle message boards have been up and running I have had the chance to rub elbows with some truly talented men and women. I have also had the chance to participate in some challenges and contests, the first of which was PC offer to give away 500 gently used Cricut Expression machines to schools nominated by Cricut Circle members. We had a small window of time to log in, and fill out the form (was sitting in front of Monique at 8 am, getting a manicure and logging in on my Netbook).

This is my Cricut Expression getting ready to cut something out for me:


Today the Cricut Circle message boards were chirping with excitement as members started getting phone calls from Provo Craft today, saying the school they nominated had won a Cricut! The rest of us walked around all day with phones glued to our every movement, just in case we were lucky enough to get the same phone call.

Around 12:30pm the phone rang. I waited the appropriate amount of time, and answered - did not want to seem to anxious- I answered in my most charming and polite voice. This is want I heard, "Hi, my name is Frank. I am with XYZ Air Duct Cleaning Company. We are in the neighborhood..blah blah blah..." I was crushed. But now I had to hang up nicely and quickly so as not to take out my frustration on poor Frank, and NOT miss the phone call from ProvoCraft. (insert mopey face here)

Then at 3:11pm the phone rang again. Since it has seemed to ring uncontrollably all summer, only 2 calls in one day seemed odd. I answered appropriately again. This time I heard, "Hi, this is Linda, from Provo Craft. Is this Sauni ? I am calling to let you know that the school you nominated will be getting one of our Cricut Expressions."... So to my coworkers, we should have a new toy to play with in Sept/Oct when it arrives.! I promise to help you figure out all the bells and whistles.

Wednesday, July 21, 2010

How to Make a Simple Photo Board or Backdrop

After searching around for a Photo Tent or backdrop to use at home, I hunted for “How To’s” online. Many required more tools and materials than I had around the house. I did find some white foam core board that might work. It was a 20” x 30” board. To this I incorporated some of the techniques I found online.


1. Measure in from the short side 15 inches (1/2 the width) in several spots making guide marks with a craft knife. Then using a metal ruler cut 2/3 of the way through the board. Do not cut through the whole thing.

2. Gently fold the board toward the uncut side, creasing the backing paper.

3. Set the board on the table with the uncut side facing up. Along this fold line run a strip of white Duck Tape to strengthen it.

4. Fold the board again, and run a second strip of tape along one half of the board, folded across the cut edges of the board(s) and across the other board.

5. Mark a 10” x 12” cardboard (backing from a pad of paper) diagonally. And using scissors, cut along this line.

6. Cut a line 1 – 1 ½ “ in from the straight (not diagonal) side of each triangle. Be careful not to cut all the way through

7. Add a strip of Duck Tape to the uncut side of the triangle to strengthen the fold

8. Use adhesive strips to adhere 1” strip of each triangle to the folded board. Short side should line up with but not go past the cut edge of the foam core board. I folded my board before attaching my triangles (easels)

9. You are ready to shoot your first pictures. Be sure to provide lighting from beside the board. – In my example below I only had one light to the left, but I would recommend one on each side if possible.

More about this project in an upcoming post.

Tuesday, July 20, 2010

Let Me Introduce Myself - A Profile Expanded - Scrapbooking

I am an Elementary School Teacher, part time Assistant Principal. I have taught for more than 20 years in this district, as well as 2 in Japan. I have taught all grades K – 6th , but enjoy 2nd through 4th the most. I have always kept journals and created scrapbooks. Approximately 18 years ago I was introduced to Creative Memories Photo Album/Scrapbooks, about the only choices back then. I loved the removable pages and the longevity of the product. I was hooked, a way to combine both. I figured I would do my wedding album. Funny, I did not even start that album until 2 years ago.

Since then, I have completed more than 35 albums. I have 4 more in the works right now. My style has changed, but then so have the tools of the trade. When I started, we would take our acid free papers to work and cut shapes from the Ellison Die Cut machine. Rather limiting. Mrs. Grossman was the only sticker maker available, and printed and textured papers were very rare. Now, the array of tools, paper, embellishments, and even album style choices has expanded. I now have a Cricut Expression, instead of the Ellison at work. Here are few examples of what I am talking about.

One of my first pages:


A few from my last completed album, with a few simple flourishes from my Cricut:


Blog, Blog, Blog...How to start this first Blog?

Notes to self and others:
I have been considering a blog for quite some time. But what should I write about? Politics? Hmmm…. I would love to have conversations with others on this subject but not sure I am qualified to write about it. Nor do I want that to dominate my thoughts. There are too many fun and happy things to think and do to stick to what can be a source of not so positive thoughts.

I know, my Religious Views! If I thought Politics would be hard, this one would be just as rough. Again, not sure I have enough knowledge to be any help to anyone, though it is surely a much more positive topic.

What else am I interested in? Just about a hundred other topics I am sure. A large number of them center on my love of quilting, scrapbooking, stamping, genealogy, and technology. So, if that is the case …

Do I focus on one or bounce around? I suppose my blog should reflect me; eclectic and borderline A.D.D. I don’t always stay focused on one thing but I do have fun. I know I can post more often during the summer when I am off work, but I should probably get into a habit of posting on specific days. I think I will check around some of my favorite sites to see what they do before I decide that bit. Look! I have a plan. Ooooh, planning, I like planning!
 Pick a blog name
 Pick a topic or purpose for said blog
 Pick a host and template
 Post an entry
 Invite friends to come see what I have done (if you are reading this, I must have invited you.)

Welcome!